Pasta bake... It's baked pasta!

4:22 PM The Two-Faced Southerner 0 Comments

When we were first married we found a recipe for some sort of layer-lasagna-casserole-thingy. Well, it seemed like a lot of work for very little payoff. So we adapted it, and it became "Pasta Bake." 


While a term like "Baked Ziti" sounds sexier, we started calling it "Pasta Bake" because it played well with several types of ingredients. Rotini, farfalle, campanelli, and, yes... ziti, all made wonderful Pasta Bakes. It works if you add things like mushrooms or pepperoni (put those on top). Or if you subtract stuff like spinach...


Stuff you will need:

1 lb. sweet Italian sausage (either ground or removed from casings)
2 cloves garlic (minced)
1 cup onion (minced)
1 Tbsp. Italian seasoning
1/2 tsp red pepper flake (optional)
1 can diced tomatoes (drained)
2 tsp balsamic vinegar
1 pkg. cream cheese
1/2 jar pasta sauce (use your favorite brand or homemade)
1 pkg frozen spinach, thawed and drained
1 pkg. noodles (we used ziti this time)
2 cups shredded mozzarella

Preheat oven to 400 degrees.

In a large skillet over medium-high heat, brown Italian sausage. If there is a lot of liquid in the skillet after it browns, drain most of the liquid off, leaving sausage and 1 Tbsp of liquid in the skillet.

Add garlic and onions. Cook for 2-3 minutes or until fragrant. Then add Italian seasoning and red pepper flakes. Cook 1-2 minutes more then add tomatoes, balsamic vinegar, and cream cheese. Stir constantly until cream cheese is completely melted.

Pour skillet mixture in a bowl with spinach, pasta sauce, and noodles. Fold to thoroughly combine. 

Spread evenly in a 9 x 13 and cover with the mozzarella. Bake until cheese has melted, high spots browned, and sides are bubbly (20-30 min.).

Diet info? Nah. This is cheat day business. Could be made using gluten free noodles. Or blanched and drained vegetables instead of noodles? 

Eh. It is probably just better if you wait for a bad day or a cool day or any day, and make a big cheesy pile of Italian love. 

0 comments:

Chicken and Vegetable Curry

6:46 PM The Two-Faced Southerner 0 Comments

Some nights you just want to come home, dump stuff in a pan, and make your oven work for a change.

It's time to force your ovens to make your dinner. Just get hot? Not enough. Tonight it makes you curry. 

Well... It does the cooking part. 


Things you need:

1 cup "lite" coconut milk
2 Tbsp brown sugar
1 Tbsp curry powder*
1 Tbsp fresh ginger, grated
2 cloves garlic, minced
3/4 cup diced tomatoes (drained)**
1 lb. boneless, skinless chicken breast, cut into 1" cubes
2-3 zucchini, cut into 1" cubes
10-15 button mushrooms, cleaned and quartered, 
1 red bell pepper, stemmed, seeded, and cut into 1" cubes

* Yes, I know there are a million different types of curry powder. And yes, I know there is no such thing as "curry powder," or even "curry" in India. Peronally, I use the "Hot Madras" variety.

"But I want my eyes to water and my sinuses to clear from this!"

Well in that case, add one to two Serrano peppers (stemmed and seeded) or Thai chiles (stemmed and seeded) to the sauce when blending. It will give you the requested sense of "fire-based" enlightenment... 

** I used a canned fire-roasted variety, but a regular will work just fine also. 

Add the first six ingredients to a blender or food processor, and pulse until smooth. Should you not own either a food processor or blender, just chop it as fine as is possible. Like to a pulp. Like keep chopping. Did you stop? Keep going. Ok. Almost there... And done. Salt and pepper to taste,

By the way, or "BTW" as the kids says, the sauce you just made can be made one to two days ahead and kept in an airtight container in the refrigerator. I say airtight because you don't want everything in the fridge to have a subtle hint of curry...

Preheat oven to 400 degrees.

Put the chicken and vegetables into a 
9x13 pan. Or if you live in the Southern Hemisphere, a 13x9 pan. 

Pour sauce over chicken and vegetables. Stir to combine. Place pan in previously mentioned preheated oven. 

Bake for 30-45 minutes. You want the vegetables to be softened and the chicken cooked through. If your sauce seems too thin, make a slurry of 1tbsp  cornstarch and 2 tbsp water. Add to your pan, stir, and bake 5-10 more minutes till thick.

Serve with rice, or cauliflower rice, and/or flatbread. Or just pour into a trough. Honestly, the trough thing would save me from the tedious plate refills.
 
Diet-ish type stuff:

21 day fix: cut amount of coconut milk and brown sugar you use by half. Pick out pieces to fill containers (red and green) assume sauce sticking to it will be about one orange container.

Gluten Free: double check your coconut milk and brown sugar then pair with cauliflower rice. (See recipe on site...)

0 comments:

Sweet and Sour Chicken Kabobs!

6:08 PM The Two-Faced Southerner 0 Comments


Dinner should be fun. 

Let's name a few fun things:
1. Grilling things.
2. Stuff cooked on sticks.
3. Stuff that tastes like dessert but isn't.
4. Quick dinners.

Hey, look at that. Not only does this meet every requirement listed for fun, it is tasty and kinda healthy… Now lets stab stuff with sticks! And be careful! You don't want to stab your fingers…

Sweet and Sour Chicken Kabobs!

Things you need:

1 tsp honey
1 tsp vegetable oil (could substitute with any other very light, heat resistant oil)
Juice from 1 medium lime (2 tsp?)
1/4 white pepper, ground
1 Tbsp Soy Sauce (or other soy-saucy type stuff)
2 tsp rice vinegar
1 Tbsp Hoison (this can be omitted if your diet doesn't agree with this delicious stuff)
1 lb. boneless skinless chicken breast (cut into 1" cubes)
2 bell peppers (I used red, but use whatever color floats your boat)
16-20 pieces of pineapple (Probably about a pound, maybe? I used the medium-sized, already-cut-up-from-the-grocery-store type.), cut into 1" cubes

Mix the first seven ingredients and pour into a one gallon zip top bag. Add chicken to bag and seal. Then mix, coating chicken evenly with this amazing smelling mixture. Then, lovingly place it into your fridge. Be sure to place the bag in a bowl or other container in case your bag isn't as carefully sealed and leak-free as you hope it will be…

2-4 hours later…

(At this point soak any wood skewers for 30 mins prior to using. If you are using metal skewers, you can soak them also, but it will accomplish nothing.)

Note how I used two skewers per hunks o'food. This makes turning easier.

Preheat grill or broiler to medium high heat. 

This next part is the most important. You guys… 

BE CAREFUL THAT YOU DON'T STAB YOURSELF WITH A SKEWER!!!

I cannot stress how you don't need to be like me and make yourself into a person-kabob. Seriously, don't do it. 

Now, Starting with a bell pepper, layer your kabobs. Pepper, chicken, pineapple, chicken, pepper, chicken, pineapple, chicken, pepper… Ok, what comes next?

Nothing. Nothing comes next. I reached the end of my skewer. But if yours are longer, keep going. 

Now, grill or broil your skewers on all sides rotating frequently. Once chicken has reached an internal temperature of 165, take it away from heat and let rest for 5 minutes before tearing into them.

"Hey what about them thar' greens?"

Ok… Fine.

Asian-inspired Spinach and Mushrooms

Things you need:

1 lb. Button mushrooms (sub any kind of mushroom you like here) sliced
2 cloves garlic (minced)
1 lb. baby spinach (washed and dried)
1 tsp. soy sauce (again, or some kind of soy-sauce-ish product)
1/4 tsp white pepper, ground
2 tsp rice vinegar
1/2 tsp toasted sesame oil
1 tsp toasted sesame seeds (or more…)

Preheat a medium pan over medium heat. Add a tsp light oil (I used vegetable) to the skillet and then add mushrooms. Salt very lightly. And stir until...

"Hey! You are add some that soy-sauce-ish-like stuff too! Why not add it here?!?" you shout defiantly. 

I am glad you asked. We need just a touch of salt here, not to season the dish overall, but to help the mushrooms give up their liquid. We want all that delicious liquid seeping out and hitting our hot pan. This liquid then reduces and is how we get a delicious mushroom flavor throughout. Mmmm...

Now after the mushrooms have surrendered their liquid (3-5 minutes), add the garlic and cook 1-2 minutes more until fragrant. At that point, add the spinach. It will look like your pan is not big enough. Stir until wilted down, then toss the soy sauce, pepper, and vinegar. After the spinach is all wilted BUT has retained a vibrant green color (2-3 minutes), remove pan from heat and add the sesame oil. Stir and scoop/pour/remove everything from the pan. Top with the sesame seeds and start eating.

BTW this does not make that much. Maybe 2-3 servings. Unless people don't like spinach or mushrooms and are just eating it to make you feel better, then it is about 6-8 servings. 

- End - 

Diet-ish type stuff… 

Paleo: Should be good for most of it. Check out your individual plans to see if Hoison or pineapple are part of your plan. 

21 Day Fix: Don't see it as one skewer is a serving. Fill containers with chicken (red), bell peppers and spinach/mushroom (green), and pineapple (purple) to make sure you get the right amounts. Also, might need to give yourself an orange, just to make sure you take into account all the different oils and seasonings (not on free list). 

Gluten-Free: Should be ready to rock and eat a-la-stick. Check your ingredients for a gluten-free labels and make substations as needed (shouldn't be much if any).

0 comments:

Thai Basil Turkey Lettuce Wraps

5:33 PM The Two-Faced Southerner 0 Comments

Thai Basil Turkey Lettuce Wraps


It's quick. It's easy. It's like a salad you eat with your hands. 

Depending on chopping skills, this might take you 15-30 minutes to make. 

Things you need:

2 Tbsp fresh ginger, minced
3-4 garlic cloves, minced
1.5 lb ground turkey (I used 99% fat free)
2-4 chiles*, minced
2 carrots, grated
1 tsp honey
1 Tbsp Hoison (optional)
1 Tbsp low sodium Soy Sauce
12-16 Thai basil leaves, chiifonade (sliced into little strips)
1/4 tsp white pepper
8-10 lettuce leaves, washed and dried (I prefer butter lettuce, but anything that can hold some filling will work)

*This is your decision. Want to create a pain inducing dish, add 4-6 tiny Thai chiles. Me? I used 2 jalapeños, seeded. It was medium (again this is subjective), but we could have easily dealt with more.

Get ready! This goes quickly if your ingredients are prepped!

In a large skillet or cast iron pan (or wok if so inclined), heat 2 tsp olive oil in a pan over medium-high heat. Once pan is hot 
and oil shimmers, add ginger and garlic. 

Sauté for 1 minute or until fragrant, then add ground turkey. Break up the turkey as it browns into small pieces. 

Now add the chiles, carrots, honey, Hoison, and soy sauce. Stir constantly for 2-3 minutes. 

Get ready for magic! Add the Thai basil leaves and cook 1-2 minutes till fragrant. Remove pan from heat and add white pepper.

Now go eat and proclaim the awesomeness of Thai basil!

"HEY!!! I don't see no recipe for no dippin' sauce. Add I DO see dippin' sauce in the picture!" you exclaim. 

Well, ok. Maybe a "dippin' sauce" was created... Get ready… 

Dippin' Sauce

1 Tbsp soy sauce
1 tsp Siracha
1 tsp honey

Mix. There you have it. Dippin' sauce. Dip it, spoon it over, use it as a palate cleanser… it is your decision. 

Diet-ish type stuff...

Step one for any diet: avoid too much dippin' sauce. I suggest spooning it over the wraps so you know how much you get or avoiding it all together.

Paleo: The Hoison and honey are optional. You could substitute
 salt for the soy. Just depends on how many of the ingredients are not on your approved list.

21 Day Fix: Mixture is mostly a red container, but meal could be a red and green combo with the right lettuce. Also, avoid too much soy or Hoison. 

Gluten Free: Make sure your Hoison and soy sauce are gluten free, then chow down.

0 comments:

Lime Cauliflower Rice!?! Oh, and some AMAZING Jerk Chicken...

7:51 PM The Two-Faced Southerner 0 Comments

Lime Cauliflower Rice!?! 

Oh, and some AMAZING Jerk Chicken…


Yes, that does look like rice. Did I mention how fluffy it is?Light. As. A. Cloud. Oh, and laced with lime, thyme, and garlic… It could be a song. Or a carb. But it is neither.

You say, "Tell me about that jerk chicken. It looks mighty tasty."

We will get to that. First, the cauliflower rice…

Things you need:
One head of Cauliflower
2 cloves of garlic (minced)
2 small limes (cut into pieces)
1/2 cup diced onion
3-4 springs of thyme
1/3 cup water

First, use the shredding blade on your food processor. Use the plunger to press each of the florets of the cauliflower via the feed tube. Discard the very center of the cauliflower (or you can run that too, that is up to you). It tends to be very fibrous.

For those who have a different name for it, or wonder what this device is that came with their food processor, the picture to your right is the shredding blade. BTW it also makes slices… If you do not own a food processor, just run a knife across the outside of the florets and, while it happen very slow, you will eventually get a rice like consistency.
Moving right along… heat up a large skillet over medium-high heat (I used the heat from the charcoal on my grill). Now, add 2 tsp. vegetable oil, then the onions and garlic. Let it sauté for a few minutes, then add the shredded/riced cauliflower to the onion and garlic. Let the cauliflower sauté for minute or two, then add 1 tsp salt and 1/2 pepper. If you add salt to the cauliflower immediately, the salt will cause the cauliflower to give up its liquid too quickly. Wait a few seconds. Also, add up to 1/3 cup water. It doesn't need to be a soup like consistency, but there should be enough liquid to cover the bottom of the pan. This will help the cauliflower to cook evenly.


"Hey. I can see the chicken in the picture. Can we talk about it now?" you expound. Give it a second, we are almost done with the rice. 

Once everything has had a chance to cook for 7-9 minutes or so, squeeze the juice out of one of the limes you cut up. Then drop the pieces right in. You heard me. Just drop them in. Also toss in the sprigs of thyme. Then give everything a stir. 


"Hold on here. You have more pictures of the chicken. Do I see a wing?!? Let's talk about the jerk. Is it a marinade or a sauce or both? How long did it sit? Were you able to…"

STOP. We are almost done with the rice. This is the exciting part! Rice, but no carbs AND it's really a vegetable! How cool is that?

(murmuring something about a chicken and a jerk…)

Now, let it cook, stirring occasionally. When the water has evaporated and the "rice" is tender, remove from heat. Now fish out the sprigs of thyme and lime wedges.

Just prior to serving, squeeze the other lime wedges over the top of the rice or serve on the side.


"STOP SHOWIN' ME PICTURES OF THE CHICKEN YOU WON'T TELL ME ABOUT! Sure. It may be part of the background of an image, but I want the JERK CHICKEN!!!"

You didn't have to shout. I was just about to tell you.

Jerk Chicken:
Recipe adapted from Bon Appetit

By the way… This is will falls more towards the "Indulgent" heading.

It is not really "bad" for you. It just doesn't take into consideration things like, being a low-fat marinade or using skin-on chicken. But on the other hand, it's not like we are eating deep fried chicken or something swimming in ranch dressing. So all-in-all, it is good food. Not low in calories, but high in flavor. If on a diet, just watch your portions.

You will need:

6 tablespoons vegetable oil
3-4 scotch bonnet or habanero chiles, or 4 serrano chiles (adjust for heat as needed)
1/4 cup fresh lime juice
2 Tbsp apple cider vinegar
2 scallions
1/4 of a medium onion, sweet onion or Vidalia preferred
3 garlic cloves, peeled
1 Tbsp fresh thyme
2 Tbsp packed brown sugar
1.5 tsp ground allspice
0.5 tsp ground cinnamon
1.5 tsp salt
0.5 tsp ground black pepper
1 whole chicken, cut into pieces (or a couple of breasts and wings… or, if you don't know how but want to learn, click here and Gordon Ramsay can teach you how.)

Mix everything in a blender or food processor until it is chopped finely, combined, and emulsified. The consistency should be that of a thin milkshake… Whatever that means.

Place all chicken pieces into a gallon Ziplock bag and cover with the mixture from the blender. Seal the bag and place into a bowl to prevent any leaks. Let sit 1-2 days in the refrigerator.

When it is time to cook, grill over medium-high flames until golden all on both sides, then transfer to the cooler side of the grill to finish cooking.

If NOT grilling, sear each piece of chicken in a skillet then transfer to a baking sheet and place in a 350 degree oven until cooked through.

Chicken is done when the internal temperature reaches 165*.

"HEY! I spent all that time making a marinade and now we are just throwing it AWAY?!?"

Well. I don't suppose we have to toss it out. I mean you could pour the used marinate into a shallow saucepan, then add 1/4 cup water and bring to a simmer (reaching a temperature of at least 190*). Then, you could pour this now slightly thickened marinade/sauce over the top of said cooked chicken while it is cooling… Then DEVOUR it.


0 comments:

Homemade Tortillas

6:44 PM The Two-Faced Southerner 0 Comments

Stop torturing your family with store bought tortillas!!! 

They are so simple to make! 


They look good don't they? 

Just waiting for some thin slices of grilled steak or chicken... and maybe a smear of your NOT-from-a-jar, fresh, delicious salsa. Ahem, you did make your salsa, didn't you? No? Then click here

Things you need:
3/4 cup Warm Water (like hot water out of the faucet)
3/4 cup Masa Harina (corn flour)
1 tsp Olive Oil
Pinch of Salt

(This recipe make 6 tortillas.)

Mix all the ingredients together with a fork or your fingertips. It should have the consistancy of Play Doh. Wrap in plastic wrap and let it rest for 5-10 minutes. 

Preheat a skillet (cast iron or non-stick) over medium heat. 

Roll your dough into a cylinder. Cut in half and then cut each piece into 3 pieces (you end up with 6).


Now, on to the tortilla pressing in your tortilla press. What? You don't own one? You are really missing out on the hot fashion accessory of the season. Well, if you don't just use a rolling pin to make each tortilla the same size and a round shape. Well, that sounded boring... Back to my tortilla press club.

Place the small ball of dough about one inch towards the hinge from the center.


Now use that fantastic machine!


See, so easy. Just do that pressing thing six more times, and you are ready for the skillet! And make sure it is hot (remember how I told you to preheat your skillet).

Place one round in the center. (If you doubt your cast iron pan's seasoning, just brush a very light coat of olive oil on the bottom.) And yes, it might sizzle. It also might not. 


After cooking for 30 second to a minute, flip and cook another 30 seconds to a minute. Then remove the tortilla to a plate and cover with a towel. Now comes the fun part... Filling. 


Oh, you wanted tortilla chips? Fine. Slice your cooked tortillas into six triangles. Spread on a greased baking sheet and bake at 400* to desired cripiness.

Diet-ish type stuff...

Paleo - Sorry. This is a cheat day thing. Hello carbs.

21 Day Fix - Two tortillas equal one yellow box.

Gluten Free - Celebrate! These have NO gluten. Just make sure your corn flour isn't mixed with wheat flour or some type of weird gluten-containing flour.


0 comments:

Salsa-bration! Red salsa and Zucchini salsa

5:07 PM The Two-Faced Southerner 0 Comments

Stop having "just another" Taco Tuesday!


Jarred salsa? 

Please, we are not animals!  It's time to rise up and reclaim you tortilla! Say no the goopy, slimy stuff that get a whole section of the supermarket aisle. It's time to plant your "I'm worth it!" flag into mount Tuesday and not ruin your diet because of alliteration with tex-mex.

"Standard" Tomato Salsa  
(adapted from Rick Bayless' recipe in Mexican Everyday)

1 can (14.5 oz.) Fire Roasted diced tomatoes (or regular diced, but opt for Fire Roasted if possible)
Half an onion, sliced (approx. 1/2 cup) 
2 cloves of garlic, peeled
Cilantro (approx. 1/4 cup)
One Serrano (or Jalepeno) chile (or none, it is totally up to how hot you like it)

In a dry skillet over medium heat, toast the sliced onion, garlic, and chile until a just a little black on each side. 

Remove the Serrano pepper. Cut off the cap and slice in half lengthwise. With the edge of your knife, remove the seeds and discard. 

I know. I hear you saying, "But I like my salsa HOT!!! Like I want my face to melt! I am keeping them there seeds in my salsa!" Well, fine. You keep your seeds. Personally, I would just add more (or hotter) chiles. Keep the seeds in, and it will be hotter... BUT you will also get to dig seeds out your teeth for a week.

Transfer the onion, chiles, and garlic to a food processor. Pulse until thoroughly chopped. Add the tomatoes, cilantro, a pinch of salt, and a grind of pepper. Pulse until thoroughly combined and it reaches desired consistancy. Serve immediately, or, if chilled, bring to room temperature prior to serving.  

Zucchini Salsa

3 zucchini, split lengthwise into wedges (approx. 2 cups)
Half an onion, sliced (approx. 1/2 cup) 
2 cloves of garlic, peeled
One Serrano (or Jalepeno) chile (or none, it is totally up to how hot you like it)
Pepitas (Spanish for pumpkin seeds) (approx. 1/3 cup)

Preheat oven to 400 degrees.

Line a rimmed sheet pan with foil. Add pepitas and toss in 1/2 tsp olive oil and a pinch of salt. Roast on the top rack for 5-15 minutes (depending on size) until fragrant and lightly browned. Remove to a bowl to cool. Or if you bought roasted pepitas, never mind... BUT... when you make them you control the amounts of additional fat and salt.

Switch oven to broil. 

Using the same pan, add the zucchini, onion, garlic and Serrano and lightly toss with 2 tsp. olive oil and a pinch of salt. Broil until the just the tips of the zucchini are dark brown to slightly black.

Remove the Serrano pepper. Cut off the cap and slice in half lengthwise. With the edge of your knife, remove the seeds and discard. 

And if you think seeds are your "jam," please refer to the conversation above.

Add all ingredients to the blender and pulse until combined and desired consistancy. If it is too thick, you can add a little water or chicken stock. Great warm, room temperature, or chilled. 

Diet-ish stuff or whatever...

First off, ditch chips... Well, tortilla chips… Well, not all the time, but veggies are also great with these salsas, and the zucchini salsa is killer as a steamed/grilled veggie topping or over grilled chicken.

21 Day Fix - Should be able to measure both of these as vegatables. However the Zucchini salsa does also count as a seeds box. 

Paleo - Should be good all around.

0 comments:

Spring (but better in Summer) Rolls

10:23 AM The Two-Faced Southerner 0 Comments

Spring (but better in summer) Rolls

with Roasted Thai Basil-Ginger Chicken

(Individual diet info at the bottom of page)

It has arrived. For most of you, summer is here. Yes, according to the calendar summer begins the 22nd, and we are several days away from that… BUT, for most, school is out. Pools are opening up. Yards are being mown. Vacations are well underway, or at least planned, or at least daydreamed about. 

Summer. 

And what better time have a light, refreshing lunch. Something where you don't need a fork. Maybe something you can slam into some dipping sauce. Or daintily dip. Or playfully dredge. (I am not one to judge how you dip. That is your business. Unless you take all the dip. Then it has become everyone's business. Long side-note short - make plenty of dip.)

Things you will need:

Chicken (let's go into this later)
Nob of Ginger (enough for 1 Tbsp chopped)
4-5 Limes (depending on size)
Thai Basil (enough for 1 Tbsp chopped, 12-15 leaves)
Garlic (enough for 1 Tbsp chopped)
1-2 Carrots 
1 Cucumber (I prefer hothouse or English cucumbers, the kind sealed in plastic)
Rice paper
Cellophane Bean noodles (that is what the wrapper says…)
20-25 mint leaves (depending on size)
Butter lettuce or spinach, washed, dried, and torn into pieces
Crushed peanuts, 1 Tbsp (optional)

"Hold on there, fella! Where do I find some of these ingredients? Thai basil? Cellophane noodles? Paper made outta rice?"

Well, most major supermarkets have started to carry the rice paper and cellophane noodles in their asian foods section. If not, the internet is full of wonderful places that will literally bring it to your door. I have found one grocery chain in my town that carries both, but several other stores don't stock either. Get out there and look at several grocery stores (if possible) because one might have everything. 


This would make a great still life painting… 
Now, about Thai basil. That will be a little harder to find. Again, if your local grocer doesn't carry it, you could ask them to stock it, or try the internet. OR…

You could grow it! It is right beside the sweet basil in my garden. And yes, you could use sweet or some other form of basil, but Thai basil has a very distinct, heavenly flavor that you will be missing… 

Preheat oven to 375.

Let us now deal with this wonderful pile of goodies: the garlic, ginger, lime, and Thai basil. 

Get out a fine grater and remover all the zest off a lime. Be careful not to get the white pith mixed in. (It tastes bitter.)


Ginger: peel off the outer skin by rubbing it with the edge of a spoon or a knife. It is very thin and come right off. See, you did it! 

Then, peel your garlic. 

Now, you could use a knife and show us all how majestically, quickly, and finely you are able to mince up the garlic and ginger… OR…

Use the grater you used for the lime zest to make them small very quickly and easily. By the way, watch those fingers! Or at least keep bandages handy. Then, slice, or tear, or julienne the Thai basil into tiny pieces. 

Combine the ginger, basil, lime, and into a bowl with the juice from half of a lime (use the one you
zested). 

Next, we move to the chicken part. Yes, I used bone-in, skin-on chicken breasts. I know, I know… I can hear you screaming, "Hey, this here was supposed to be a LIGHT dish!?! What do you think you're doin' with all that there skin?!?"

Time to relax in a 375* sauna...
Well. If you are looking for a lighter version, use boneless, skinless chicken breast… or just take the skin off the bone-in type. Or maybe you could just not worry about a tiny bit of fat. After all, we aren't eating the skin in this dish… Just saying… Now, back to our 375 degree oven (let's hope you preheated).

Rub your chicken with a very light coat of olive oil and then sprinkle salt on all sides. Place chicken in an oven safe dish (or a cast iron skillet). Then, (I use disposable gloves for this part) massage the lime/basil/garlic/ginger mixture into the chicken. 

Crimp some aluminum foil around the top and carefully place in your oven. After cooking for 20 min or so, remove foil so chicken has a chance to brown. Remove once chicken has cooked through and reached an internal temperature of 165 degrees. 

Remove to a plate, tent with a foil, and allow to rest for 10 mins. Then, shred and chill in the fridge for what happens next. OR… slice off the bone and have this as a main dish… Maybe served with some lime cauliflower rice… but that is another post. 


Also, now would be a great time to prepare your cellophane noodles according to the directions on the package and cool.

Once the chicken and noodles have chilled, let's make some spring rolls!

Next, prepare your carrot. Scrub or peel your carrot. Then, starting in the middle, make some vertical cuts. Then use a vegetable peeler to make thin little strips. 


See, doesn't that look fancy. 

 Now, prepare your cucumber. First cut off the ends, then cut in half, then cut that half lengthwise down the middle. (Pictures are probably better than me trying to describe it…) Now use a spoon to remove the center seeds and pulp. 

Using your peeler remove the tough outer skin and then slice them into thin strips. Or you could even use your vegetable peeler again to make the thin strips…

Now… rice paper. I will never claim to know all on rice paper. In fact, I plan on having to discard a couple of pieces of rice paper every time I make them. It is why they put so many in the package. They know they are difficult to use the first couple of times. Best way I have found. Dip them in warm water. And I mean dip. Leave them in until they are loose and pliable and you will have a mess on your hands. Like dip one side, dip another side. DONE. 

Again, NO ONE has a Jedi-like rice paper mastery their first time. Or their second time. Or their third time. If you mess up, guess what? It's no big deal, just get your stuff out of the paper in question and start on another. Now, back to building lunch. 

Now then, just north of center make a line of mint leaves, then a line of carrots underneath. 


Then add your noodles and cucumber. Followed by your chicken,  lettuce, and peanuts (if using them).  

After realizing something you exclaim, "Whoa! You didn't tell me exactly how much to add!?!? What am I supposed to do, guess?" 

I suppose guessing could work, but because these are made to your liking, you can build them as you wish. Really like chicken? Add more chicken. Really like cucumber and lettuce? Go crazy. The only rule is, the more volume you try to add, the harder it is to roll. Also, for some reason the cucumber always wants to poke holes, so try to keep it in the center. 

Now find a pool, or a backyard, or maybe you need some "you time" but the kids are going crazy, so you make a plate of these and eat them in a closet. It's your choice! Either way, go eat some spring rolls!

What? Oh, I didn't tell you about a dipping sauce? Ok fine...

Lime-Sweet Chile Dipping Sauce

1 Tbsp Asian Sweet Chili sauce
1 Tbsp Lime Juice
1 1/2 tsp Rice Vinegar

Mix. 

What? That's too easy? I assure you. It is all. While straight Asian sweet chile sauce may not be good for the diet, cutting it with lime juice and vinegar is a great way to keep the same flavors, but basically make it lower in calories and reduce the amount of sugar. 

Um, Diet-ish info?

Gluten-free: check labels, but it should be ok. 

21 Day Fix: measure your veggies and chicken. Remember to use appropriate container for dipping sauce… and 3 rice skins w/ cellophane noodles will equal about 1-1.5 yellows. 

Paleo: Rice paper may be out, but using the same ingredients, this could be a killer salad or even great as lettuce wraps. Some will say the noodles are out, others may want to switch to soba (buckwheat) noodles. It is all based on how you are interpreting your Paleo diet.  (I am not a Paleo expert so don't flame me.)


0 comments:

Matt-atouille (ma-ˌta-ˈtwē)

7:34 AM The Two-Faced Southerner 0 Comments

Matt-atouille (ma-ˌta-ˈtwē)

(ratatouille with braised sausages)


Sure. I get it. You've had one of those weeks. You can't look at another piece of chicken. You are one more Pinterest-crock-pot-recipe disaster from taking an ax to your cooktop like you were Jack Nicholson in the Shining. 

You want comfort food. You crave it. Something Italian perhaps? Maybe some form of sauce covering everything? 


BUT.


You are on a diet. No pasta! Or only limited supplies of pasta… and you kinda had your allowance of carbs for the day… whoops. 


There in lies your dilemma. And here lies your solution…


The dish is loosely based on the French classic zucchini, eggplant, and tomato stew, but with an Italian twist - the addition of sweet basil sausage and herbs like basil and oregano. 


Now then, back the talking about making your face happy. 


First, we assemble most of the ingredients. 


Two red bell peppers

Two-three zucchini (depending on size)
One large eggplant (or more, it's up to you)
One 14.5 oz can of diced tomatoes
Half of a small onion
Three cloves of garlic
Three to four sprigs of oregano
Four to five sprigs of sweet basil
Two to three sprigs of thyme
One package of Italian Sausage
A tablespoon of balsamic vinegar
A pinch of red pepper flakes 

NOTE: This is where this can become a "pick-your-adventure" type dish. If you don't like zucchini or eggplant, find another vegetable or two you like and throw them in.


And for the hardware, grab a knife, cutting board, a cast iron skillet (medium-large), a foil-lined sheet pan with lip (or any oven safe pan with a lip), a piece of parchment paper large enough to cover your cast iron skillet, and your handy dandy kitchen sheers.


Chop, chop, chop.
Preheat oven to 450.

Now, start hacking away at the eggplant, zucchini, and bell peppers. Well, maybe hack isn't the right word. Maybe just dice everything into one inch pieces… remembering to remove the tough outer skin from the eggplant (if you like it, keep it, skin optional…)

And once you have a lovely assortment of diced vegetables, add them to your sheet pan (foil-lined for easy cleanup…). Then add 2 tsp of olive oil and a light sprinkling of salt and pepper. Give the veggies a quick toss to coat, then off to the oven.

However, if your oven hasn't beeped or chirped or done something to alert you the fact it did what you told it to do (get hot), toss that pan in anyway.

These guys will roast for 15-25 minutes. Of course, that is with you taking it out of the oven and giving it a quick stir a couple of times. Basically, cook them until just tender.

WAIT!!! Don't wander off! This thing is half done! Remember the sauce! The sausages!
The… Hot tub?!? (I will explain later.)

After carelessly tossing a pan of vegetables into your oven, put that big ol' cast iron skillet on the stove and crank it up to medium to medium-high. Once it is sufficiently hot, put all those lovely sausages into the skillet. No oil. You don't need it.

And yes, I know. I can feel someone reading this and saying, "WHOOAAA!! Hey there, buddy! You said this was a DIET dish. Like for folks on a diet. What in tarnation is that there Italian sausage doin' there!?!"

Well. This is a kinda diet dish. Feel free to make it with Italian Turkey sausage. It has half the fat of regular sausage. Or you could do a vegetarian version, adding mushrooms and a little extra olive oil to the pan. Or use a boneless, skinless chicken breast (salt and pepper them first!) and use a little olive oil before adding them to the pan. Or even some ground beef or lamb. So there, Mr. (or Ms.) Tattle-tale, I have given you several lower and low fat options.


Hot tub creation, complete.
Now then, where were we? Oh yes, hot tub.

Once the sausages are browned on one side (3-5 minutes), turn them over to brown the other side and add the onions, garlic, and red pepper flakes to the same pan. Sauté for a few moments until fragrant (60-90 seconds). Then add your can of tomatoes, all of your herbs, and one quarter cup of water. Stand back when you do. The pan will steam and hiss and bubble at you. And when I say drop your herbs in, I mean drop them in. No chopping. No carefully picking only the leaves off the stems. No. Throw them in. Also, just a little salt and pepper.

Drop the heat to Medium-Low.


Basically, you end up with a delicious marinara-ish hot tub for your sausages (or if you decided to be a little more fat conscious, your other meat or veggie choice… we don't judge here).

And again, I can feel someone wincing.


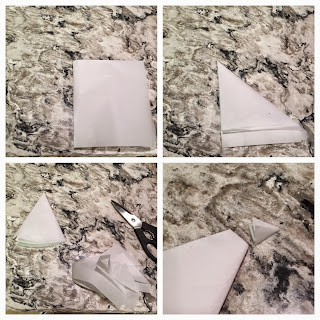
Origami for cooking...
"BUT WAIT!?!?!" you cry out. "My cabinets! My countertops! My backsplash! My favorite white shirt I tragically chose to wear today! Everything will be covered in red dots from the bubbling sauce."

And that is why you need a cover for your hot tub. This is where the parchment paper comes in. This is a technique I learned from Thomas Keller, chef at the French Laundry (and by learned from, I mean I read it in his cookbook).

First, fold the paper in half. Then, in half again. Then cut a rounded edge to the paper the approximate radius of your pan (half of the full width). Now, you have a weird snow cone shape. Then, cut the tip off and then open.


Who wants a plain snowflake?
You now have a vented lid that is disposable and will let some steam out, while keeping 98.6325% of the splatters in. That, and you may have not followed all the instructions for making a snowflake in grade school…


Now, place your "lid" on top of your hot tub. Yes, it should fall in. It is made of parchment. Every so often (3-4 min) carefully lift up the paper with tongs and stir the sauce where you can.

At this point, it has become a waiting game!

After 10-15 minutes your sausages will be done. There is no fancy trick for this. Just cook them until they are done (approximately 165 F internal temp).

Remove the pan from heat and/or turn off burner. Remove the sausages from the pan to a heat resistant plate and tent with foil. At this point you can also remove the herbs (see it is easy to pick up the big sticks of herbs floating around, isn't it?) and discard.

Mmmm… what is that amazing smell? It is probably your pan of roasting vegetables. Check for doneness and after removing from the oven slowly add all the vegetables to the pan of sauce. It will seem like there is not enough for them, but everything will mix and mingle just fine. Let it sit for a second while you slice your sausages for easy plating.

Best way to serve is a large scoop of Matt-atouille and a link of sausage (or other lower fat meat or whatever… no judgement) dusted with scattering of fresh julienned basil leaves or a little parmesan (DO NOT use the stuff in the can, so help me).

The END! And yes, my clever naming of the dish can be altered. When you make it and add mushrooms or whatever your take on it is, it becomes be Jerry-atouille. Or Carol-atouille. Or whatever-your-name-is-atouille


And I missed cleaning up a spot right there…      /\
P.S. - While meat substitutions are discussed, I understand some of you don't like vegetables. Or just flat out like pasta better. And that is fine.

Follow the same directions for the sausage and the sauce.

Wait until your pasta is just before al dente, then use tongs to add your pasta to the pan after removing the sausages and herbs. Keep it on the heat at Medium Low so the pasta can finish cooking in your sauce. Then, grab a big bowl and go to town on your pasta, my friend.

0 comments: